TECH 420 - Technical Direction for Compositing
CG Lighting and Compositing Match-to-Live - Live-Action Plate with CG Objects
Project Summary:
Using a background plate with tracked camera motion composite in animated CG objects. All conditions should be taken into account to create a finished, integrated whole including color temperature, time of day, bounced lighting, object and environment reflections, occlusion, object texture and style, and proper motion.
Results:
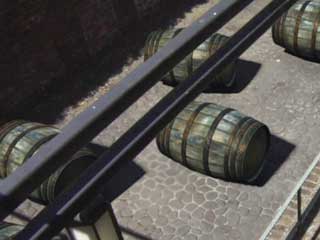
Click on the image to the right to see a finished still. Click here to see the full animation and breakdown of the scene.
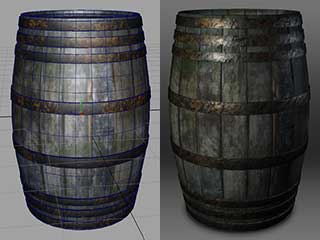 The barrel geo is very lightweight for both simplicity and faster simulation. One bump and color map was
used on all the barrels because their differences in motion and placement would mask any repetition. I wanted
them to look suitably aged and worn to match the historical and storied past of Savannah's River Street. Once
the camera move was set and tracked I created a low-poly mock-up of the alley, one copy for lighting/shadows and
the other to set up a simple rigid body sim to get the barrels moving. Once the sim was working I baked out
the keyframes and exported the whole thing so that I could bring it back into my lighting file.
I captured the background footage with a Panasonic HVX on a tripod to reduce shake as much as possible. After experimenting with several camera moves I settled on a simple pan down to capture as much of the space as possible, including the various levels, and still getting something to track. I had never attempted 3D camera tracking before and specifically wanted to explore it for this project.
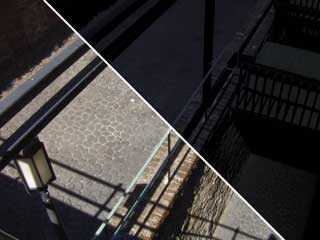 I chose this shot specifically so the barrels would move in and out of shadow. Therefore, I needed to create a 'shadowed'
version of the footage toned to match the existing shadows. I came up with what I think is a pretty
clever way to easily build it. I used Adobe Camera Raw to 'redevelop' the first and last frames so that the unshadowed areas
matched the shadows. Each had different settings which I applied to the whole sequence, making two groups of images.
I then did a simple fade over time between the two in Photoshop (which has simple animation tools) and output the result as a third image sequence;
one in which the entire frame is 'shadowed' thru the sequence, matching top-of-frame shadows at the beginning and the bottom
at the end. From this I was able to piece together in Photoshop
one large shadow plate
for the sum of the environment shown in the shot. Since the shadows would always be under the barrels,
I was able to roughly remove large portions of the environment which would occlude the barrels and ignore sections
that would never be affected.
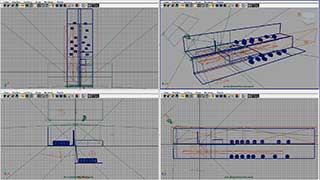 After tracking and setting up the camera I moved on to the lighting; using RGB lights to split each out into its own channel
for adjustments and color grading independent of the rest of the scene. The numerous light sources in the scene required more
than one diffuse and spec pass in the RGB workflow. To the right is a 4-view of my lighting setup from all the passes
along with all the camera projections for textures. A directional light stood in for the strong early-morning sun,
spotlights acted as sky fill, and large area lights simulated the large spans of bounced lighting from floor and walls.
The lighting conditions are sufficiently different that I made two versions of most of the render passes, one for the top and one for the bottom. This way I had different channels and could adjust each location separately. Certain cases, such as the cast shadows, where adjustments would be the same were rendered as one whole plate.
 Click on the render layers list to see all of the passes broken out.
Render Layers:
• DiffuseKey - Main key, fill, and bounce lights.• Diffuse2 - Bounce light from walls and ground.
• Ambient - The basic color of the object's surface, independent of any lighting or shading.
• objectMatte - Pure red matte describing the silhouette of the object.
• castShadows - Shadows cast by the objects in the key light, used as a mask for the shadow plate.
• objEnvCastShad - Shadows cast by the environment onto the objects.
• grndEnvCastShad - Shadows cast by the environment onto proxy geometry, used to mask shadow plate.
• objOcclusion - Ambient occlusion on the object itself, used as a mask for a color grade to darken the surface.
• grndOcclusion - Ambient occlusion on the ground surface, used as a mask for a color grade to darken the surface.
• specKey - Highlight shape and color for main lights.
• spec2 - Highlight shape and color for secondary lights.
• zDepth - Depth pass for depth-of-field adjustments.
• camProj - Various layers used to generate views of scene from specific angles for capture and projection of certain surface textures.
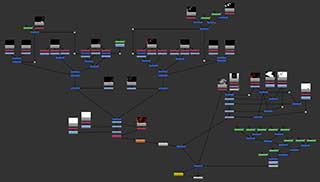 Compositing the layers in Nuke involved splitting out the lights so that each could be graded on its own
and added back into the total. The key light pass in particular is masked off by the environment cast shadows
pass to correctly break it up over the surface. All of the diffuse and spec passes were treated as such and
merged with plus nodes back together. That combo was then multiplied into the graded ambient layer to complete
color for the object.
The jumble of nodes to the right of the tree shows the complex machinations needed to get the shadows cast on the environment by the barrels to mask correctly so that the shadow plate would show through but not double up on the existing real world shadows. Also linked in are the occlusion passes set so that they would only affect the areas within shadow. Several plates were needed to get the shadows at the far end of the alley and those nearer to camera to work correctly despite the camera movement.
 Though there were many stumbles and slow-starts trying to get good background footage and a good track, I am very
happy with the way the final product turned out. It definitely challenged my problem-solving skills to get the shadows
to jive correctly with each other and with their real-world counterparts. Other than a few tweaks here and there I
think it is largely 'finaled'. I might adjust the textures on the barrels slightly, or maybe redo the sim but I don't
think it needs much past that. I made sure to build the files in such a way that if, down the road, I want to change the
camera move or even the objects comped in that it will be a fairly simple swap out.
Click on the image at the left to see the final video with a breakdown.
