TECH 420 - Technical Direction for Compositing
CG Lighting and Compositing Match-to-Live - Reflections
Project Summary:
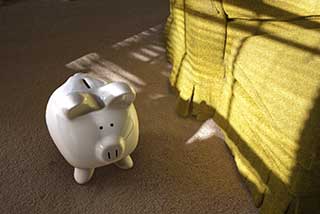
Using a combination of reference images, light probe images, and a background plate composite in a CG object. This object should be between 20-80% reflective and be shaped in such a way that it reflects onto itself. Pay particular attention to the behavior of its reflections of the environment and of itself, and of its reflection onto any surrounding objects if necessary.
Results:
Click on the image to the right to see the final composite.
Click here to see a video breakdown of the scene.
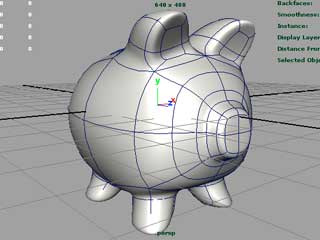 First things first: the model. After a string of more hard-nosed, industrial themed models I
wanted to go with something a bit more lighthearted. I saw this little, white, ceramic piggy bank
while out hunting for suitable light probes and thought it was perfect for the job. I had never
tried modeling with sub-division surfaces before and the shape of the bank seemed to suit the
strengths of subDs well so that's what I chose. Eventually it was converted to polys for ease
of UVing and future texturing.
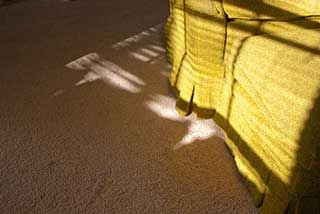 Next up, the background plate. I often find myself studying the lighting that I get in my apartment in late afternoon,
when direct light from the window plays with bounced, sky light from the open door, and spills bright green bounce onto
the walls from this old armchair. I waited for the right time of day and took several shots as light passed over the room
and finally arrived at this one. It gives a good indication of strong light with soft fill and also a great color spray onto
the ground. I loved the colors playing against each other.
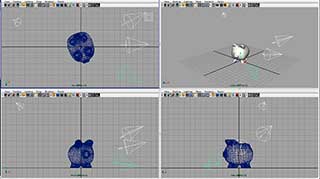
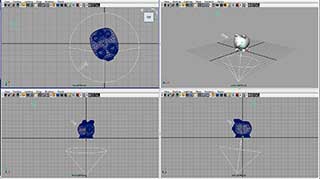 After setting up the camera and getting the scale of the scene set I moved on to setting up the lighting. We used an RGB light
technique to split each light out into its own channel for adjustments and color grading independent of the rest of the scene.
Using this trick, one light is set to pure red, another to pure blue, and the third to pure green. This means that each shows
up chromatically pure in the correspoding image channel, making it easy to split it out. Having more than 3 lights required two
sets of diffuse passes to cover all the various light sources found in the plate. At right are screen caps of the primary and
secondary diffuses passes as set up in Maya. The first one covers the direct light thru the window, the softer fill from the
open door out of frame at the upper left, and bounce from the ground. The second set contains three spots throwing light from
the chair and another for sky bounce coming thru the window.
In order to maintain fine tune control over the composite the scene was split out into numerous render layers for lighting, reflection, occlusion and other information. Because I was going to have a faint reflection of the object on the ground I had to have two versions of most of the passes, one for the pig and one for the ground. This was generally easy to achieve by just making a duplicate of the main layer and adjusting primary visibility on the objects to for the ground versions. The layers and their functions are described below.
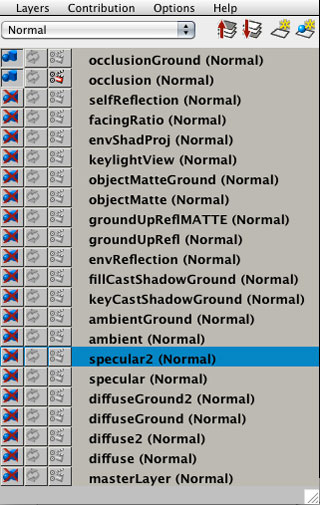 Click on the render layers list to see all of the passes broken out.
Render Layers:
• Diffuse - Main key, fill, and bounce lights.• Diffuse2 - Strong bounce from armchair and soft sky bounce thru window.
• Specular - Highlight shape and color for main lights.
• Specular2 - Highlight shape and color for secondary lights.
• Ambient - The basic color of the object's surface, independent of any lighting or shading.
• KeyCastShadowGround - Shadows cast by the object in the key light, used as a mask for the shadow plate.
• FillCastShadowGround - Shadows cast by the object in the secondary light.
• EnvReflection - Reflections of the environment on the object.
• groundUpRefl - Reflections of the ground plane up onto the object.
• groundUpReflMATTE - Pure red matte delineating the area of ground reflection on the object.
• objectMatte - Pure red matte describing the silhouette of the object.
• keyLightView - The scene from the point of view of the key light; used for generating cast shadow maps.
• envShadProj - Uses the maps generated from the above layer that 'casts' the shapes of the evironment shadows onto the object.
• facingRatio - Uses the surface's facing ratio to drive its color, used to affect reflections so that they grow stronger as the surface faces away from the camera.
• selfReflection - The reflection material with a color map plugged into the ambient color slot so that it too shows up in reflections; therefore the object reflects itself.
• occlusion - Ambient occlusion on the object itself, used as a mask for a color grade to darken the surface.
• occlusionGround - Ambient occlusion on the ground surface, used as a mask for a color grade to darken the surface.
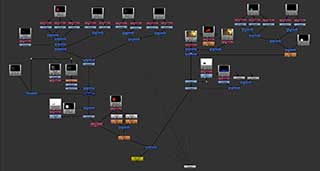 Compositing the layers in Nuke involved splitting out the lights as described above so that each
could be graded on its own and added back into the total. The key light pass in particular is masked off
by the environment cast shadows pass to correctly break it up over the surface. All of the diffuse and spec
passes were treated as such and merged with plus nodes back together. That combo was then multiplied into the
graded ambient layer to complete color for the object. Reflection passes were then plus merged onto
the result and finally the occlusion pass darkens the whole thing by acting as a mask for another
grade node.
For the plate layers, the ground cast shadows passes acts to mask off a previously prepared shadow plate in which the background has been appropriately darkened in areas where the object will cast. The ground diffuse, spec, and ambient layers are comped in the same way as their object counterparts. The ground occlusion and a secondary cast shadow pass act to darken the ground in the same way.
 Finally: the finished plate. I am extremely happy with the way this one turned out. The piggy bank sits very
well down into the plate and the play of the strong bounce lighting from the chair is particularly enriching.
I would very much like to explore this kind of lighting in the future, with strong color bounce and multiple
sources casting several shadows. I plan on returning to this one to add a simple, toy-like paint job to the
bank and adjust the material surface qualities so that it's not quite so smooth.
Click on the image at the left to see the final video with a breakdown.
