VSFX 319 - Programming Models and Shaders
Maya and Renderman RSL Shader Pattern Animation
Project Summary:
The animation and notes on this page explain how custom shaders written in the RenderMan Shading Language can be animated using SLIM parameter expressions driven in Maya.
Results:
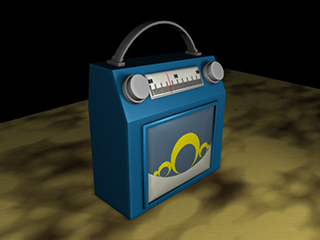
Click on the image to the right to see the final animation.
The Tale of the Happy Little Radio
Our story begins with a simple geometric pattern, programmed by hand in the RSL language. Below is the code that set up the .sl shader, including the variables I used. Default code was used for setting up specularity and light acceptance. The custom variables I declared act as radii values for the circles in the pattern. This came in handy later when I wrote the expression to drive their animation in Maya. The pattern began simply as a blue field. What follows is the process of building the pattern by adding the shapes progressively, thru code
surface
st_coloration(float Kd = 0.8,
Ka = 1,
Ks = 1,
roughness = 0.1,
Large_inner = 0.04, /*[0 0.5 .001] Large inner circle radius*/
Large_outer = 0.075, /*[0 0.5 .001] Large outer circle radius*/
Medium_inner = .005, /*[0 0.5 .001] Medium inner circle radius*/
Medium_outer = .011, /*[0 0.5 .001] Medium outer circle radius*/
Small_circle = .001; /*[0 0.5 .001] Small circle radius*/
color beige = color(0.929,0.929,0.835);
color yellow = color(1,.95,0);
color blue = color(0.352,0.450,0.521);
color hlcolor = 1
color surfcolor = blue;
normal n = normalize(N);
normal nf =faceforward(n, I);
Building the Pattern
 //First: adding the center circle.
if ( ((t-.5)*(t-.5)) + ((s-.5)*(s-.5)) < Large_outer)
surfcolor = yellow;
 //Adding a smaller, off-center circle with the same color
 //as the background serves to knockout to a crescent.
if ( ((t-.554)*(t-.554)) + ((s-.554)*(s-.554)) < Large_inner)
surfcolor = blue;
 //Now, the two medium circles to either side. Reversing the s and t
 //values mirrored them across the large circle's center of symmetry.
if ( ((t-.82)*(t-.82)) + ((s-.3)*(s-.3)) < Medium_outer)
surfcolor = yellow;
if ( ((t-.3)*(t-.3)) + ((s-.82)*(s-.82)) < Medium_outer)
surfcolor = yellow;
 //Then, the two knockouts for those.
if ( ((t-.85)*(t-.85)) + ((s-.318)*(s-.318)) < Medium_inner)
surfcolor = blue;
if ( ((t-.318)*(t-.318)) + ((s-.85)*(s-.85)) < Medium_inner)
surfcolor = blue;
 if ( ((t-.92)*(t-.92)) + ((s-.21)*(s-.21)) < Small_circle)
surfcolor = yellow;
if ( ((t-.21)*(t-.21)) + ((s-.92)*(s-.92)) < Small_circle)
surfcolor = yellow;
 /*And finally, the large sweep of beige across the corner. I placed this last,
and therefore above all the others, to act as a knockout so that if the blue
circles became too big during the animation it would act as a knockout for
them and keep them from extending beyond it's edge.*/
/*And finally, the large sweep of beige across the corner. I placed this last,
and therefore above all the others, to act as a knockout so that if the blue
circles became too big during the animation it would act as a knockout for
them and keep them from extending beyond it's edge.*/if ((s*s)+(t*t) > .95)
surfcolor = beige;
This last bit finishes off the lighting calculations for the surface and closes up the shader.
color difcolor = diffuse(nf) * Kd;
color ambcolor = ambient() * Ka;
vector i = normalize(-I);
color speccolor = specular(nf, i, roughness) * Ks * hlcolor;
Oi = Os;
Ci = Oi * Cs * surfcolor * (difcolor + ambcolor + speccolor);
}
color ambcolor = ambient() * Ka;
vector i = normalize(-I);
color speccolor = specular(nf, i, roughness) * Ks * hlcolor;
Oi = Os;
Ci = Oi * Cs * surfcolor * (difcolor + ambcolor + speccolor);
}
Expression-driven Animation
 Now that I had my pattern it was time to put it to motion. I reminded me of a little face, with
two small eyes bordering a large gaping mouth. That gave me the idea of animating it to sound or
music, using the amplitude or volume of the track to drive the size of the "mouth". I soon found
out that Maya cannot do such things easily. Several people suggsted Houdini but at the time I had no experience
with it and learning not only the program but also soundwave-driven animation put that beyond my time constraints.
Again, I had bitten off more than I could chew. Or did I?
Animating the eyes was an easy trick for me. I had previously written a script for my VSFX 160 class for a random blink animation. I simply modified the code from its original application to suit this one. After some minor stumbles, I finally switched its syntax from nested If-Else loops to a Switch/Case statement. This worked perfectly and, if I do say so myself, more elegantly.
It was the eyes' expression that finally gave me my solution for the mouth. I couldn't use sound to drive it directly but I could fudge it a bit and make it look like it was. I set to work on writing a second expression that would randomly pick a number to incrementally increase or decrease the mouth size while keeping it within certain proportions. If it was wider, the code would choose to close it down a bit. If it was smaller, the code would open it up. But always randomly and never in a predictable pattern, this randomness gave the results their realism in that it didn't pulse or repeat. It fluttered and fluctuated and gave the illusion of moving by sound, much like a speaker cone.
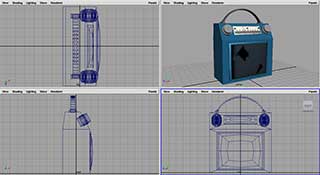
Click on the pattern image to the right to see a demo of the eyes blinking and mouth singing. Below are the blocks of code that drive the facial animation.
//Eyes expression:
int $blink = rand(101);
int $count;
int $caseType;
switch ($caseType) {
case 0: if ($blink <= 3) {
RadioShader.Medium_inner = 0.000;
$caseType = 1;
$count = 0;
};
break;
case 1: if ($count <= 4) {
$count++;
} else {
RadioShader.Medium_inner = 0.005;
$caseType = 0;
};
break;
default: RadioShader.Medium_inner = 0.005;
break;
}
//Mouth expression:
int $case;
int $count;
if (RadioShader.Large_inner >= .04) {
$case = 1;
} else {
$case = 2;
}
switch ($case) {
case 1: $count = `rand 1 5`;
$incScale = `rand 0 .006`;
for ($i = 1; $i <= $count; $i++){
RadioShader.Large_inner = RadioShader.Large_inner - $incScale;
if (RadioShader.Large_inner < 0) {
RadioShader.Large_inner = 0;
}
};
break;
case 2: $count = `rand 1 5`;
$incScale = `rand 0 .006`;
for ($i = 1; $i <= $count; $i++){
RadioShader.Large_inner = RadioShader.Large_inner + $incScale;
if (RadioShader.Large_inner > .04) {
RadioShader.Large_inner = .04;
}
};
break;
default: RadioShader.Large_inner = .04;
}
Context
Well great, I had my pattern animation.....now what? I needed some kind of context for this; I needed it to tell a little story. To me the "face" in the pattern looked rather childish, rather cartoony; like the graphics I remember seeing on toy electronics when I was a child. That's it: a radio! A little toy radio with a screen and a little face singing along with the music. And so I built my happy little radio, keeping the geometry, and concept, simple. A shiny blue blinn and a photoshopped dial face spruced it up. After getting the shader on the surface and rendering a test, there was still something missing. It wasn't emotive enough. It needed to enjoy this more. It needed to dance!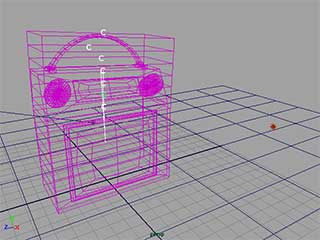 Surrounding the radio with a lattice, I then attached a bend deformer for a side to side motion.
Once again, I used an expression to drive its motion to make it rhythmic and smooth. I wanted the top
half of the radio to bounce as it swayed so I grouped each layer of lattice points to a cluster
deformer and again used an expression to drive it's repitition. Using the sine of time multiplied
by a constant was an easy way of making the animation loop while controlling the speed. The
multiplier outside of the sine calculation tones down the movement so that is gentle instead of
spastic. For instance, the topmost cluster had the most displacement with sin(time*16)*.45 and each
successive layer had less such that the bottom layer was sin(time*16)*.1. This was to give it that
bouncy, elastic look. Click on the image at right to see a demo of the deformers in action.
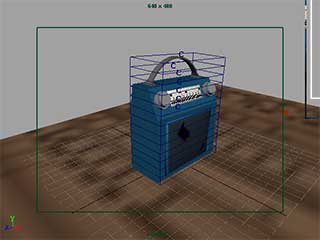 After some tweaking of the textures (the dial face refused to show up at first) and adding further
lighting I was pretty close to happy with it. You will notice that the camera angles in this
playblast differ from those in the previous one. The wireframe version is actually the final
path. The first animation was simply longer than it needed to be and without a close up on the
screen it was really missing the point of the project: to show an animation built into a shader.
The dancing radio was just icing on the cake at this point. You can see the playblast after tweaking at the right.

Final Product
I used Deep Shadows d-map shadows on two spotlights; one over the camera's left shoulder and the other low and to the right of the screen as a fill light. I originally used a 1024 map but it proved to be overkill and bloated render times unnecessarily. The point light you see in the playblasts was used only for testing purposes and was removed for this final pass. The dial face is now in place and the edge normals on the radio have been hardened up to correct them after smoothing the screen.Click on the image at left to see the final movie.
